|
Charmayne's Quilling and Curly Cues |
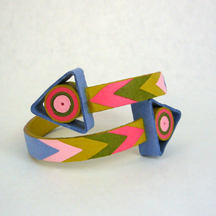
bracelet from paper!
The design concept is by Erin Curet, Little Circles.net, "Let's Go Thataway Bracelet". I happened upon her YouTube video and decided it was a good day to give the bracelet a try. Once again, as with her snowflake earrings, I did not have her paper, or stacked quilling form. Let's make do!
| My first step was to find the correct size ring upon which to build the bracelet. I am still in a cast, so that makes rummaging through closets and cupboards difficult. I cut a paper strip the 20cm I needed the circumference of the form to be and measured bottles, glasses, etc., until I remembered my set of ring cookie/biscuit cutters. One was almost perfect. I wrapped it with Scotch tape to prevent the bracelet from getting glued to the tin. |
| Some comments and suggestions... I used Erin's recommended technique of solidly gluing the paper as you wrap the form. It adds the strength and stability you will want in the bracelet. This did not work well for me when I shaped a tear drop out of the circle for another project, but I think I needed more practice. It sure worked this time! She uses the tiny tip glue applicator, stretching and smoothing the short area you are actually gluing, and Erin is very precise with both the glue and the positioning of the strip on top of the previous wrap. I worked at this... foot in a cast brings huge amounts of patience with all the time I seem to have! For the first bracelet, I used my "spread glue with a pin" method, learned in the 1990's when I quilled for a short time. My second bracelet was faster as Bob handed me the tiny tip applicator bottle of glue I had put in his Christmas stocking, for use with his 3-d paper airplanes. Wow. I love it and have a Christmas list started although he is willing to share. If you don't have one of these little bottles, it is well worth the money. Just keep the tip in a damp paper towel as you work. |
 |
The upper arrow points to a
weak spot in the bracelet. A very weak
spot. Erin tells us to add additional glue all around the joint. I did.
I let it dry the 24 hours. And broke my triangle free from one side the
first time I tried to put on the first bracelet I made. OK. Re-glue and
let dry again. I successfully put the bracelet on the next day. But
today when I dropped, it broke again. This is even after the PPA
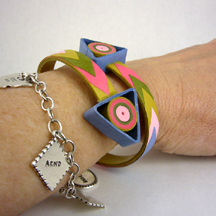
glue. To show you the bracelet can be put on, I took a picture of it on
my arm. You just have to be extremely careful when you put it on and
when you remove it. For my second bracelet, I
thought about cutting out a spot in the triangle to place the band into.
Foot in cast. Sounds
too hard to assemble and set up a support for the triangle and find Bob's exacto
knife set. Next time! |
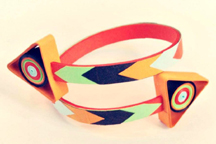
 Erin Curet's Let's Go Thataway bracelet |
Yes, I like
the bracelet. Thank you, Erin, for sharing! The link to her video: Let's Go Thataway bracelet by Erin Curet |
Back to Charmayne's Quilling home page Back to Charmayne's Jewelry page